From Zero to Flutter: Setting up Your Development Environment and First App
All you need to get started with Flutter Development


Hey everybody, Are you someone that's interested in App development? Do you wanna learn tech that is emerging and has huge potential moving forward? Then you're at the right place. We will be learning about Flutter today! Without further ado, let's jump right into it, shall we?
What is Flutter?
Flutter can be defined as a framework or software tool that allows developers to build beautiful and functional cross-platform(Both IOS and Android) mobile apps that people can use on their phones. It's like having a set of tools and materials that you can use to create a really nice house, but instead of building a house, you're building an app for people to use on their phones.
With Flutter, developers can create apps that look and feel great, with lots of cool features like buttons, animations, and pictures. They can also create apps that work on different kinds of phones so that people with iPhones, Samsungs, or other kinds of phones can all use the same app.
The best part is you can build such applications with a single codebase!
You can also build other web applications, Desktop applications and so on but flutter is mostly famous for Mobile app development.
In simpler terms, it is a framework that allows developers to build high-quality, cross-platform mobile apps with a single codebase.
Why is flutter gaining popularity?
Flutter is becoming more and more popular among developers because it allows for fast development and has a rich set of pre-built widgets, allowing developers to build beautiful and functional apps quickly. Additionally, Flutter is known for its fast performance and hot-reload feature, which allows developers to make changes to the code and see the changes instantly in the app without needing to restart the app. More importantly, Community support!
Flutter has a growing and supportive community of developers, which means there are lots of resources available, including documentation, tutorials, and forums, to help developers get started and solve any issues they encounter.
Also, it is worth noting that Flutter is built and backed by Google.
In Fact, Here are some examples of apps built using Flutter:
Google Ads app
Reflectly journal app
Hamilton musical app
Tencent Now news app
Groupon merchant app
What do you need to get started?
Flutter is a framework that is built on Dart. Dart is an Object-oriented programming language that is used as the primary language for flutter. So, it is advisable that you learn dart to begin with. I have already written an article on Dart to help you get started with it, you can check it out here.
It is worth noting that both Flutter and Dart are backed by Google.
Setting up your first Flutter App
Requirements:
Hardware requirements are not too demanding so you should be fine.
On the software side though, You can develop with flutter on Windows, MacOS, and Linux. Supported Versions include:
Windows: Windows 7 or later (64-bit)
macOS: macOS 10.14 (Mojave) or later
Linux: Ubuntu 18.04 LTS or later, Debian 9 or later, Fedora 28 or later, or any other Linux distribution that supports GNOME or KDE desktop environments.
Flutter SDK:
The Flutter SDK is the main tool used for developing Flutter apps. You can download the latest version of the Flutter SDK from the Flutter website: flutter.dev/docs/get-started/install

After installing the Flutter SDK, Here are some steps you need to follow:
In Windows:
Extract the contents of the downloaded file into a new folder, for example
C:\src\flutter.Add the
flutter\bindirectory to your system'sPATHenvironment variable.Open a new command prompt window and run
flutter doctor. This command will check your system for any necessary dependencies and provide guidance on how to install them.
In MacOS:
Extract the contents of the downloaded file into a new folder, for example
/Users/<your-username>/development/flutter.Add the
flutter/bindirectory to your system'sPATHenvironment variable by adding the following line to your~/.bash_profilefile:export PATH="$PATH:/Users/<your-username>/development/flutter/bin"Run
source ~/.bash_profilein a new terminal window to reload yourPATH.Open a new terminal window and run
flutter doctor. This command will check your system for any necessary dependencies and provide guidance on how to install them.flutter doctor
In Linux:
Extract the contents of the downloaded file into a new folder, for example
~/development/flutter.Add the
flutter/bindirectory to your system'sPATHenvironment variable by adding the following line to your~/.bashrcfile:export PATH="$PATH:~/development/flutter/bin"Run
source ~/.bashrcin a new terminal window to reload yourPATH.Open a new terminal window and run
flutter doctor. This command will check your system for any necessary dependencies and provide guidance on how to install them.
Integrated Development Environment (IDE):
An IDE is a software application that provides comprehensive facilities for software development. Three of the most popular IDEs for developing Flutter apps are:
Android Studio: Android Studio is an official IDE for developing Android apps, but it also supports Flutter development. It can be downloaded from the Android Studio website.
XCode: XCode is the official IDE for developing applications for apple products. It is provided by Apple and can be downloaded for free.
You can download Xcode from appstore or from here.
Visual Studio Code: Visual Studio Code is a lightweight and versatile code editor that is easy to use and can be customized to your liking. It can be downloaded from the Visual Studio Code website here.
Although we will primarily be using only Visual Studio Code as our IDE, it is mandatory to have at least one of the two other IDEs installed as they allow us to set up device simulators which are crucial for the development process. (In my case, I will have both installed and show you the same as well).
Android/iOS emulator:
Android Emulator: The Android Emulator comes with Android Studio and can be used to simulate an Android device on your computer.
Step-1: After installation, Launch the application and create a new project by clicking on the "start a new android studio project" option on the welcome screen.
Step-2: Follow the prompts to configure the project such as location etc.
Step-3: Once you've done that, from the menu bar, Select "tools" and select "AVD Manager" to launch your Android Virtual Device Manager.
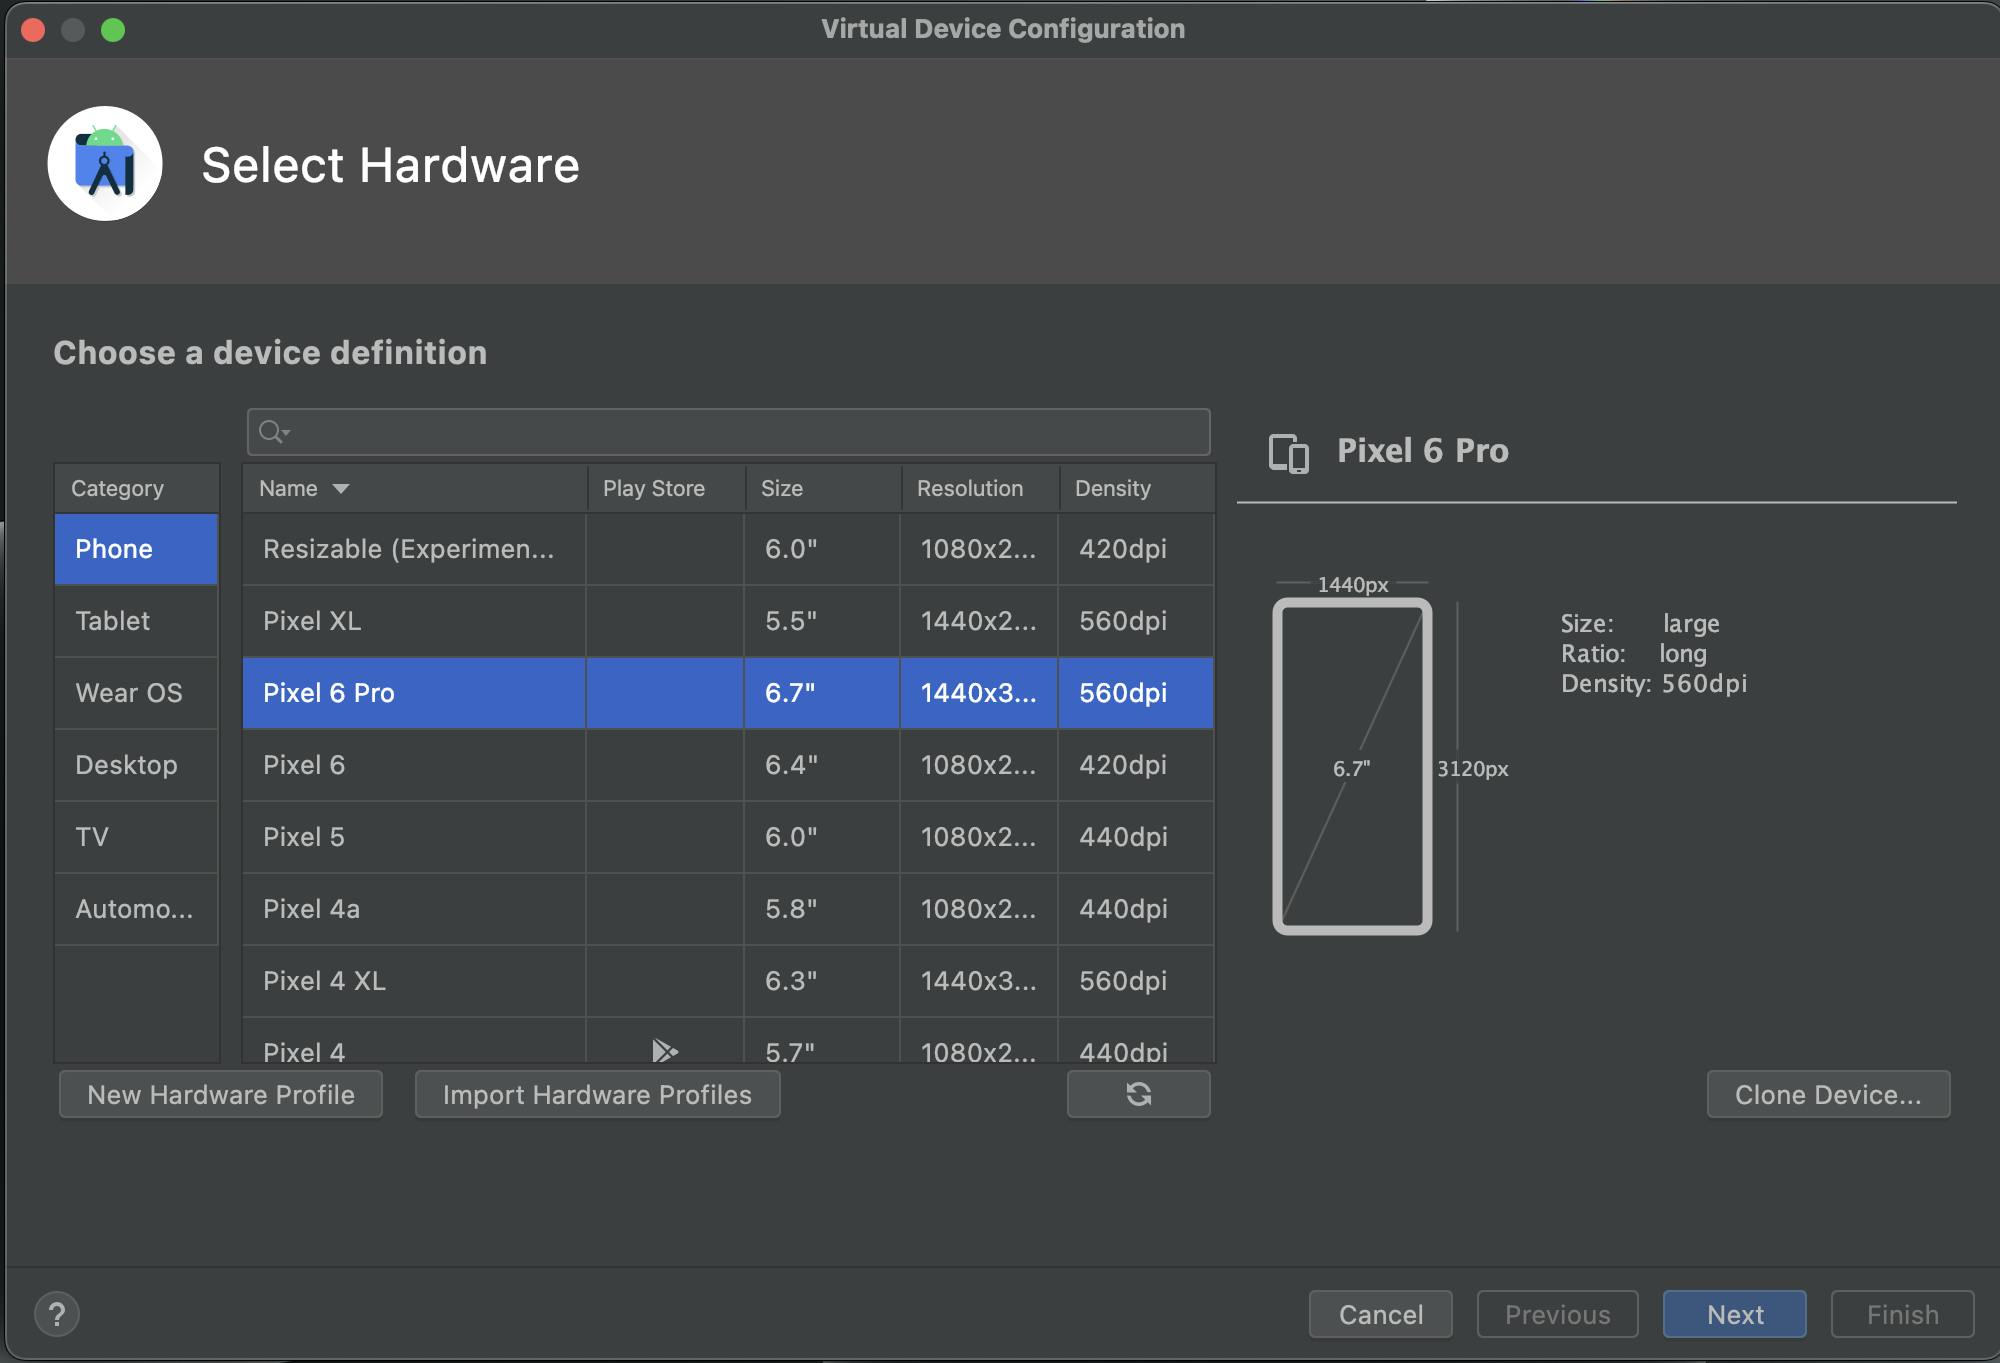
Step-4: Click on "Create a new virtual device" and based on your needs or choice, choose the device (This determines the hardware capabilities and specifications).
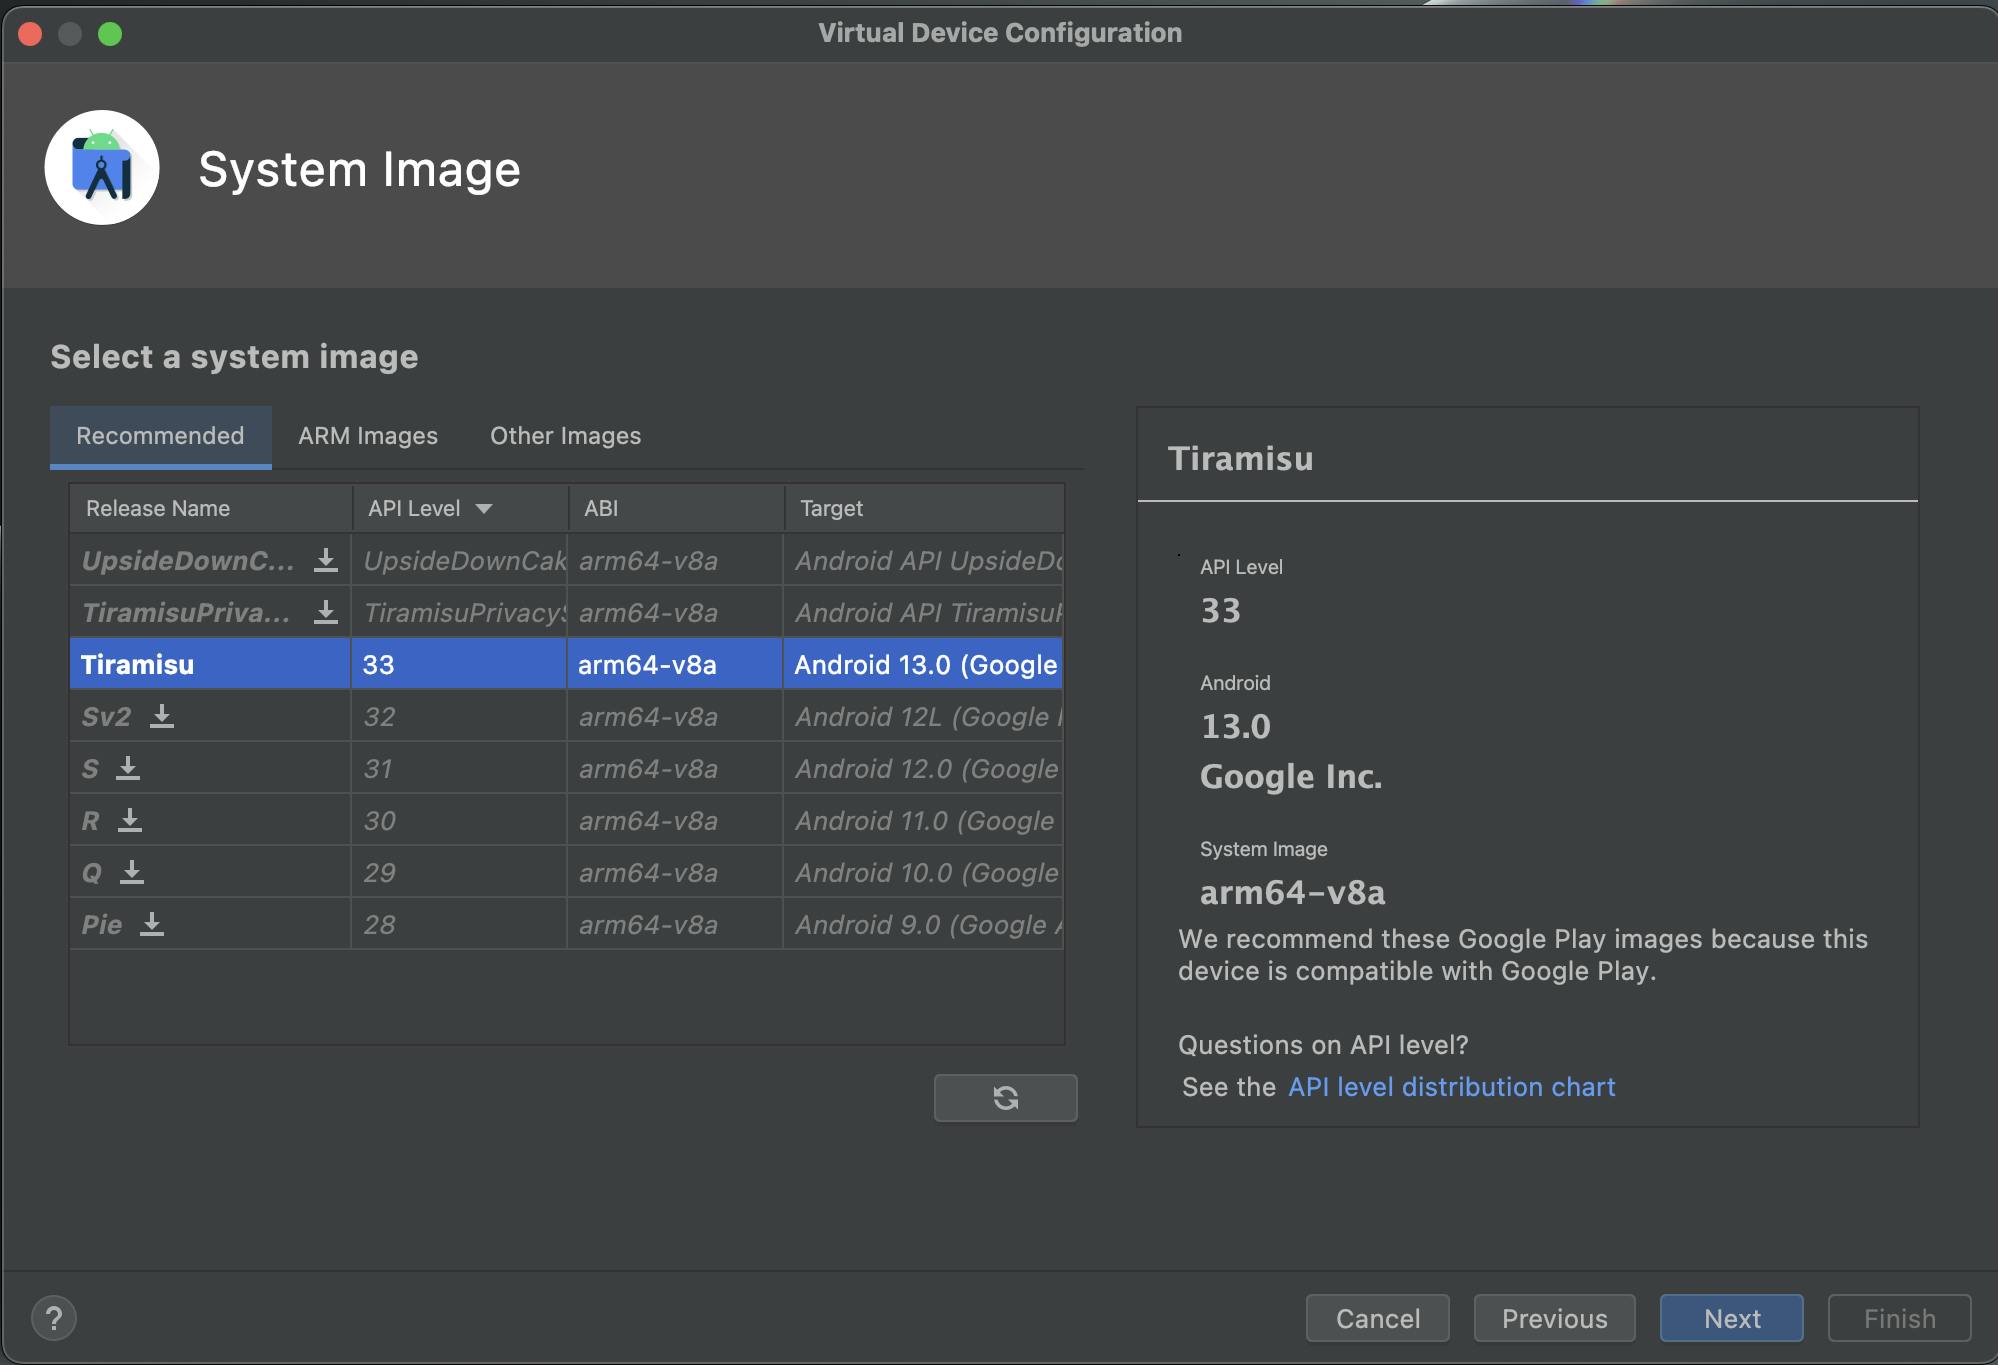
Step-5: Next, Choose a system image based on the Android version you want to test your app on. You can download additional system images by clicking on the "Download" link next to the system image.
Step-6: Click on "Finish" to finish creating the virtual device and click on play button to launch your virtual device.
iOS Simulator: The iOS Simulator comes with Xcode and can be used to simulate an iOS device on your Mac.
Steps to install and run IOS Simulator:
Download and install Xcode from the Mac App Store if you haven't already done so.
Launch Xcode.
In the top menu bar, click on "Xcode" and select "Preferences" from the dropdown menu.
In the Preferences window, click on the "Components" tab.
Scroll down until you find the "Simulators" component and click the "Install" button to install the latest available simulators.
Once the installation is complete, close the Preferences window.
In the top menu bar, click on "Xcode" and select "Open Developer Tool" from the dropdown menu.
From the sub-menu, select "Simulator" to launch the iOS Simulator.
In the iOS Simulator, you can select the device and iOS version you want to simulate by clicking on the "Hardware" menu and selecting the appropriate options.
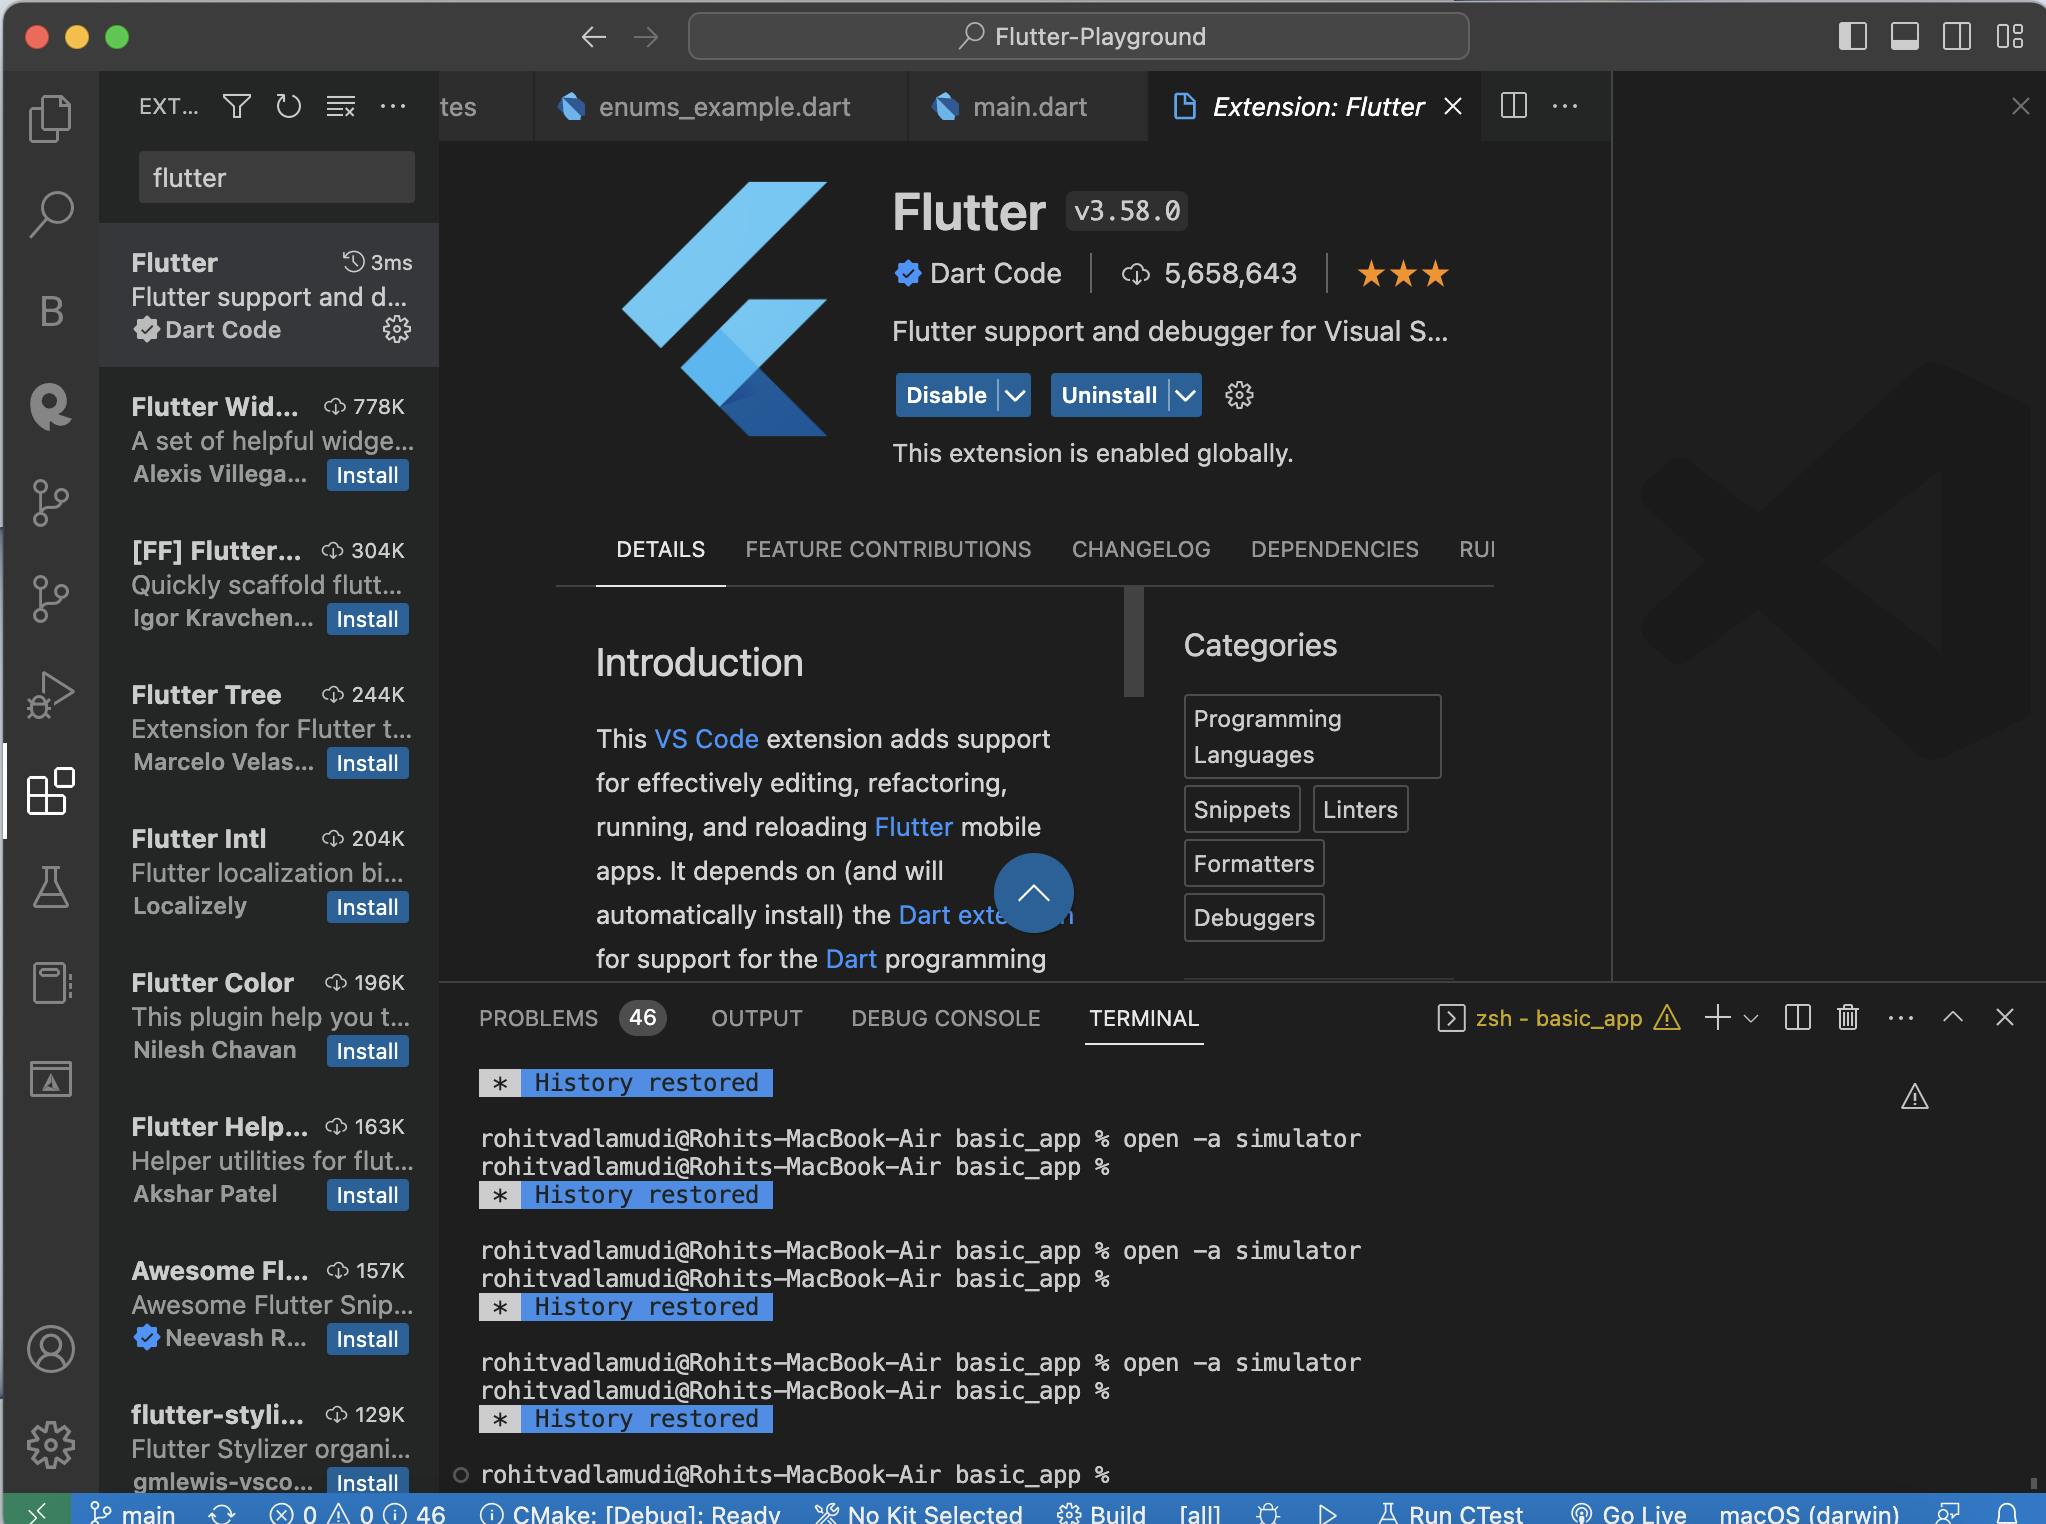
After you have all of these installed, you're all set to create your first app. But, as an additional step for the sake of convenience, Open VS Code, Go to the 'extensions' section and install an extension called 'flutter'.
Creating your First App
Once you have installed all the above requirements, you are good to create and build your first app. So, let's get to it.
There are two ways you can do this, one is through Command line (recommended to get your hands dirty) and the other is directly through VS Code.
Let me walk you through creating your first app using the Command line tool:
Open a command prompt or terminal window.
Navigate in and out of the folder structure using the command 'cd' which stands for change directory.
Type
flutter createfollowed by the name of your project, for example,flutter create my_first_flutter_project.flutter create basic_appWait for the project to be created. This might take a few minutes as the Flutter command-line tool downloads and installs the necessary dependencies.
Once the project is created, you can navigate to the project directory using the
cdcommand, for examplecd my_first_flutter_project.
Once you create a flutter project, open the same in Visual Studio Code to start building, debugging and running the application. So, let's get to it, shall we?
As you open the project/app folder, you see that there are many files that are created and available. What are these and what are the ones you will be working with? How each one comes into play? Let's take a look at them:
Structure of a typical Flutter project
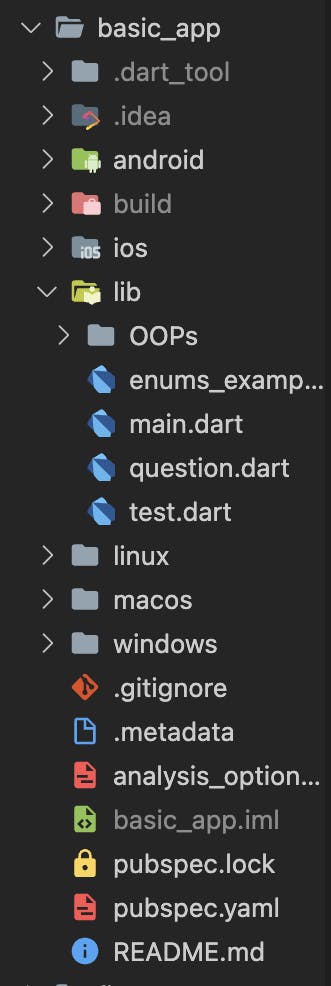
The file structure would look something like this, where:
lib/: This directory contains the Dart source code for the project, such as the main app logic, UI components, and business logic.
main.dart: This file is the entry point for the app and contains the main() function that runs the app. It typically imports and runs the app widget.
Android/: This directory contains the Android-specific configuration files and source code for the project, such as the
AndroidManifest.xmlfile and the Java/Kotlin code.ios/: This directory contains the iOS-specific configuration files and source code for the project, such as the
Info.plistfile and the Objective-C/Swift code.test/: This directory contains the Dart test files for the project, such as unit tests and widget tests.
assets/: This directory contains static files and resources that are bundled with the app, such as images, fonts, and configuration files.
pubspec.yaml: This file is the project's configuration file that specifies the project's dependencies, metadata, and other settings.
pubspec.lock: This is autogenerated and maintained file by flutter, it basically has all the details of the dependencies and you don't work on this file.
The lib directory is where you'll spend most of your time writing code for your Flutter app. The pubspec.yaml file is where you'll specify the packages and plugins that your project depends on. The main.dart file is where you'll write the code to create and run the main app widget. The assets directory is where you'll store any resources that your app needs, such as images or configuration files.
This structure is just a convention and can be customized to suit your needs. However, sticking to this convention makes it easier for other developers to understand and navigate your codebase.
Running your Flutter App
Now that you have created your project and have an understanding of the project folder structure. Let us see how you can run your applications.
Remember I mentioned that though we will be using VS Code for building our project, We need at least one of the other two IDEs (Android Studio or IOS Simulator). As I have mentioned, these IDEs come with in-built Device simulator which allows you to run applications virtually without needing to have the physical device present. How cool is that?
Irrespective of which device or platform you wanna run the application on, you can do it right through Visual Studio Code itself. The only thing you need to ensure is that a device simulator be it Android or iOS is connected and running.
You can either use the below command in terminal to run the IOS Simulator:
open -a simulator
Or, You can choose the device to be connected and simulate from Visual Studio Code by clicking on 'Device' on the bottom right and choose the device you want to simulate.
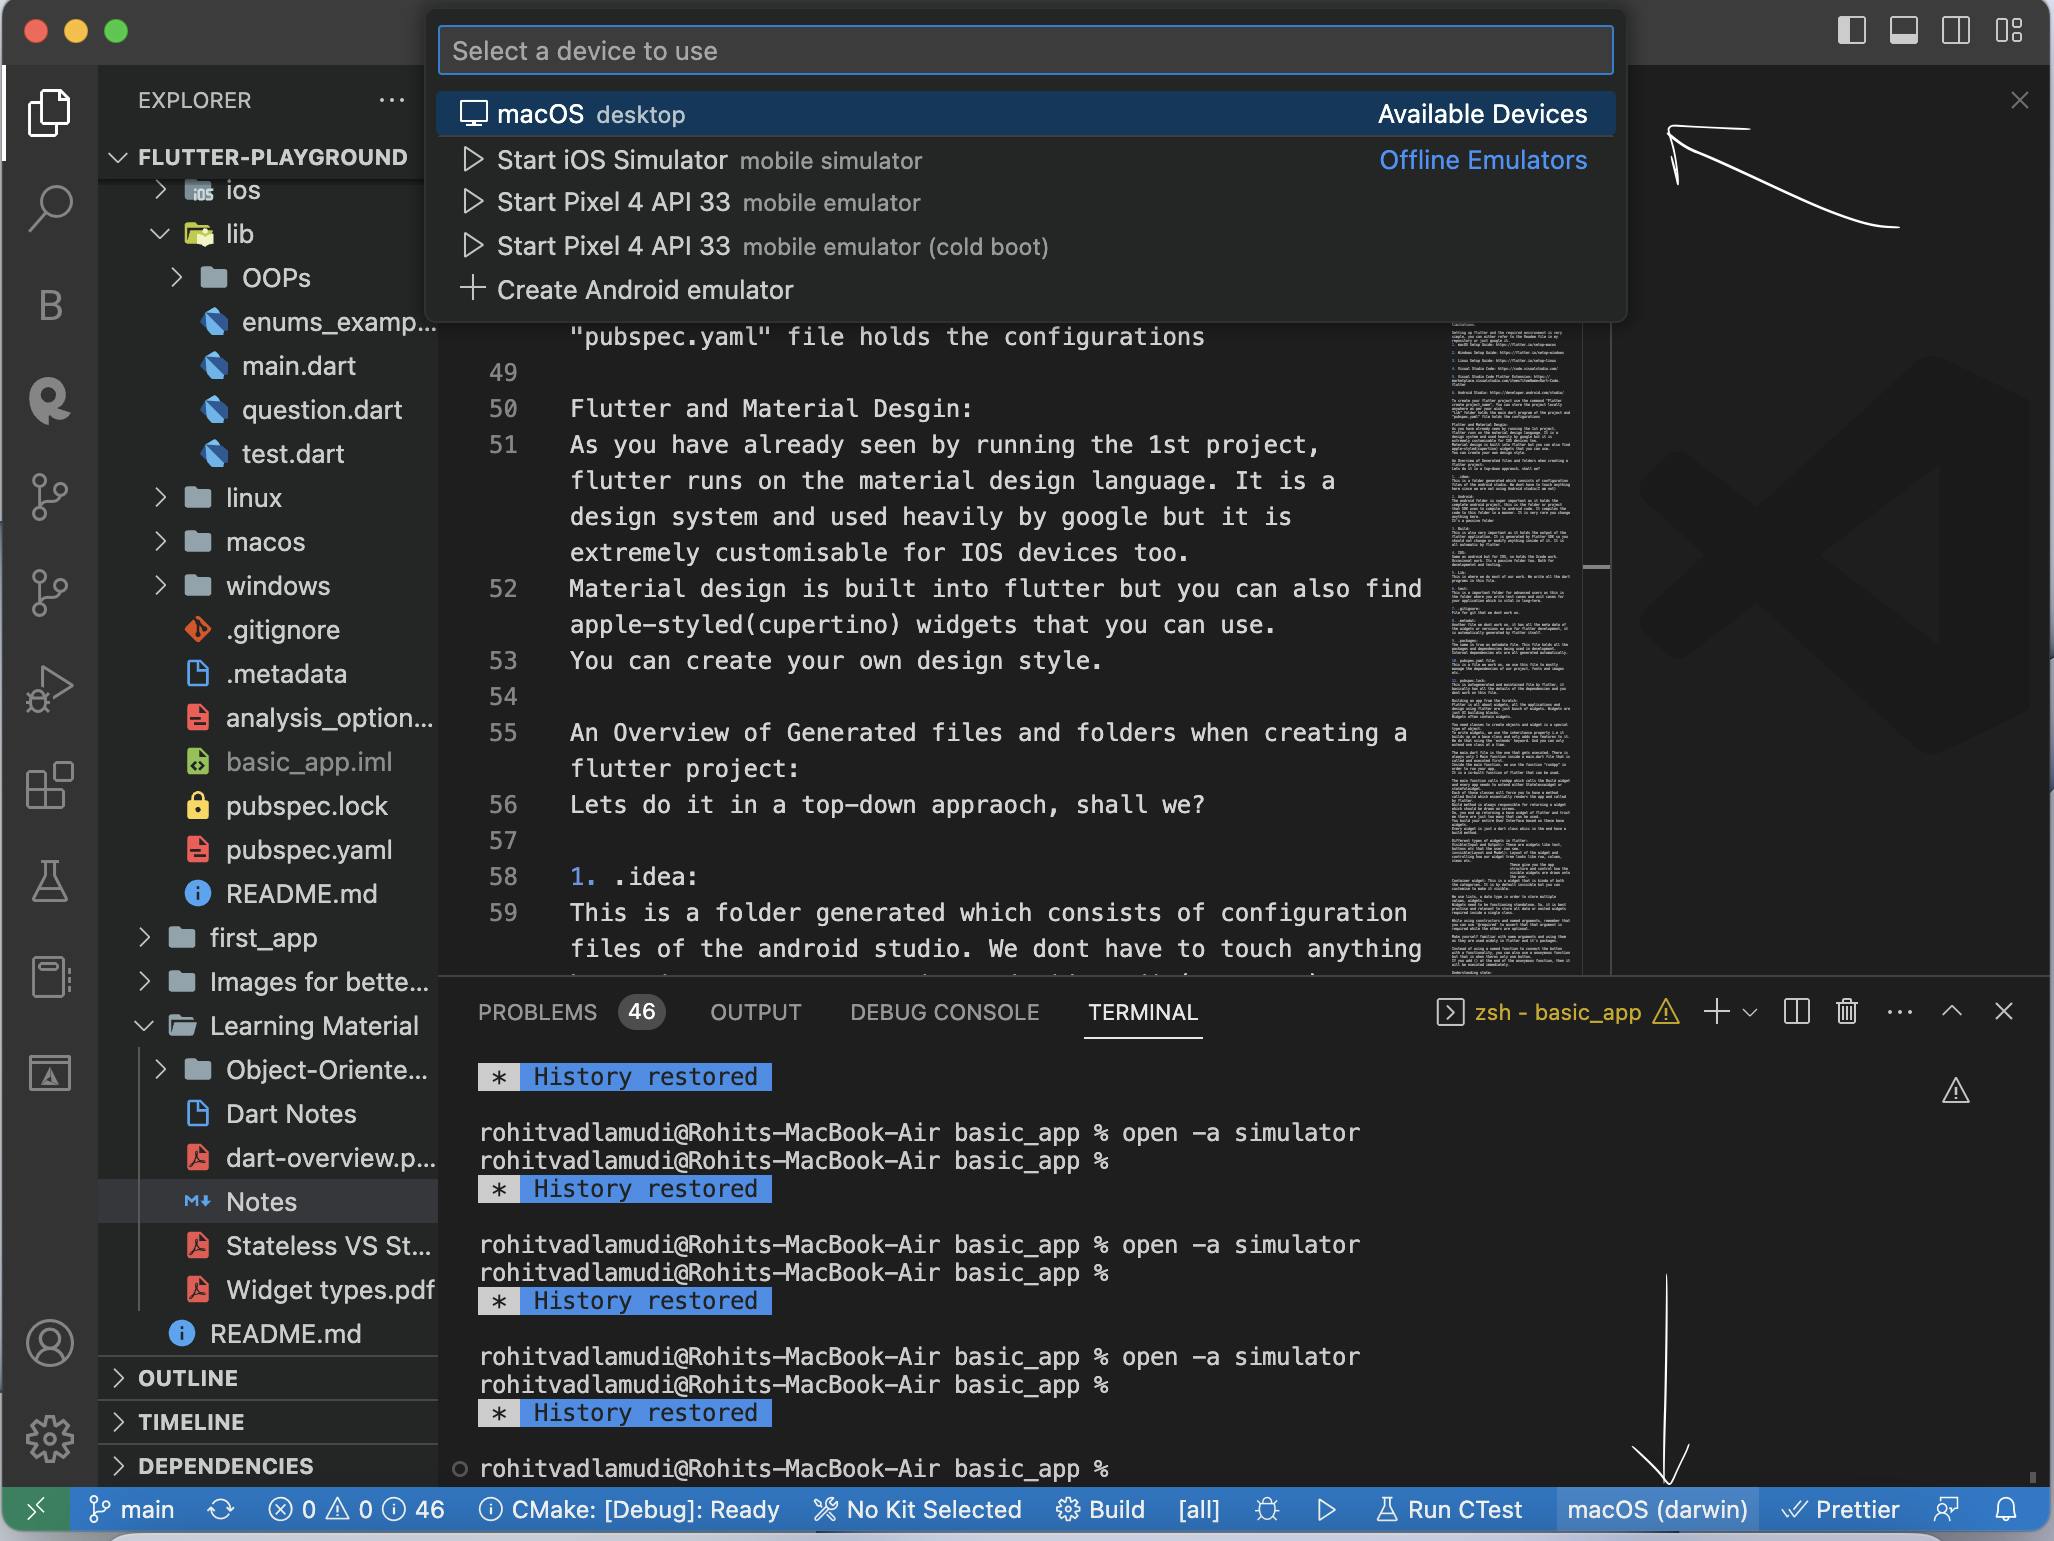
Once you have one simulator connected and running as demonstrated above, You are just one step away from running your app.
All you need to do now is open the 'terminal' and use the command below:
flutter run
The above command will build the app for you, connect to the device, build on it and run the application for you virtually on the chosen simulator.
But, There's a better and easier way to do this!
In the VS Code Window, You can simply navigate to top of the window where you will see a 'play' button. Just click on it! It will do the same thing as above but will provide you with a 'feature bar' to better work with the simulator. It will look something like this.

And that's it, You have successfully built and run your application, you can use the app you are working on through the selected simulator, and play around with it to see if it works the way you want.
Now that you've run the application, is your job done? What if you encounter issues? What if you don't like something and want to make a change? Do you have to restart the entire application to make changes?
Don't worry, I got you covered more like flutter does. Flutter has some features called 'Hot reload', 'Restart' and 'stop' to help ease your work.
Quick edits and debugging
Let us say you did not like the colour of the app or banner, you wanna change it. It is as simple as going back to your code, changing the line that affects the colour and after you are done editing or making changes, just Save them. Saving the code immediately triggers a hot reload and reloads the app instantly and brings the changes into effect. Or you can also choose to select the 'hot reload' button in the 'feature bar' I showed you above.
But sometimes, we might encounter a few issues or code changes that can only take effect when the application restarts. Worry not, as you can click on the 'restart' button or use the 'R' in the terminal to restart the application for you.
Another command called detach is also present which allows you to keep the app running but terminate 'flutter run'.
And thus, you have your first application running.
Closing remarks
There are a few other things that you might encounter and I highly recommend you to try things for yourself and learn, if you don't get it, get involved in communities and ask for help or take references online.
Flutter is still relatively new and emerging. It is easy to learn and enjoyable to work with.
In this article, we have covered the basics of Flutter, Why flutter and help you get started with building and running your first app.
As I already mentioned, Flutter is primarily built on dart, so if it's okay if you don't know about it, I have already covered a blog on it, make sure to check it out and stay tuned for further blogs to keep learning about dart and flutter.
Resources
Flutter is new and emerging, so it is vital for you to get involved in communities to ease your learning, you can ask questions, take help, help others. Here are some communities and resources to help you with flutter development:
A few communities you can consider getting involved in are official flutter discord, Dart official discord, and local community groups focused on mobile app development.
GitHub Repos to get involved in (Optional)
Thank you for reading
Like |Comment | Share | Follow Rohit T for more!
You can catch me on my socials here, and even let me know how this article helped you, and what would you like me to cover next!